Monday, May 2, 2011

Veggie Grilling Tips for my Vegetarian Friends

In response to a question I received from a vegetarian reader, I will address a great and common question regarding veggies on the grill.  Here's the question:
"Aaron, can you pass on some tips for veggie grilling so that I can in turn pass them on to my hubby? :) He's usually in charge of the grilling but has been known to over char and turn all my veggies (also vegetarian) into a blackened crisp. Is it best to wrap most in tin foil or put them straight on the grill? Upper or lower racks? What herbs are your favorite? We tend to grill a lot of eggplant, zuc, yellow squash, mushrooms, asparagus and potatoes."
I find that if I can grill it, I will inevitably burn it at some point, so my advice is based on tons of failure. When I grill veggies I take out a big 'insurance policy' by using one or more of three things.

  1. Grill Basket: This isn't always what the store calls a "grill basket" because those are usually just wire mesh that is almost the exact same thing as putting it on the grate itself. I guess it's technically a steam basket, but I use one of these (pictured right) . I got mine at IKEA for about 13 Euros. I have also gone as far as drilling holes in a metal mixing bowl (the wife was not very happy about that one). When you use this method, it allows the smokey flavors in, but keeps the scorching flames out. The high heat of the aluminum/steel sears the veggies a little too so they brown nicely.
  2. Oil. I use a lot of olive oil when cooking veggies. This especially works when using the aforementioned grill basket.  Oils speed up the cooking process by taking on a higher level of controlled, consistent heat. As where air circulates, changes temp rapidly and is just downright unpredictable. Bottom line, lubricate with whatever you'd like. EVOO for great flavor but not all the fat. Butter for a lot of fat and a lot of flavor, and canola or vegetable oil if you like your grill to smoke really bad, cause a grease fire and smell like old fish. :)
  3. Aluminum Foil: This is a griller's best friend. You can use it to protect your veggies from high heat/flame (as seen in the stuffed jalapeno recipe), or you can use it to wrap your corn (as seen in the pictures of the Thai Chili Burger recipe). I like using foil packs for veggies like corn on the cob and mushroom packs. I load the packet up with a quarter stick of butter (EVOO will work too), salt, pepper and garlic powder.--it comes out amazingly! It's also acceptable to just smack the cob right down on the grill! Pay close attention to the charring and keep it rolling to help it cook evenly. Corn is good at speaking for itself but is also easily enhanced. 
When experienced grill cooks cook meat, they often use the "DON'T TOUCH IT!" method.  Well, veggies are almost the exact opposite. Vegetables aren't made to me grilled, they're perfect as-is. So you have to treat them a little differently from meat. Take a tip from Japanese steakhouse chefs and use the "KEEP IT MOVING!" method. If you're using the grill basket method, keep stirring the veggies with a fork, tongs, etc. If you're making corn in foil or in the raw, keep it rolling. If you're using bare veggies like sliced eggplant, pay attention to your heat and keep it flipping. You want it firm, but not raw. It is possible to replace a beef patty completely with a well cooked, thick slice of eggplant. 

As far as using the upper or lower racks, I assume you're talking about a gas grill. I don't own a gas grill, but I am moderately experienced at using them at work and at friends' houses. The upper rack of a gas grill is a great place for veggies, but not the fastest way to get the job done. As opposed to the bottom grates, you'll probably double your cooking time. Just use the methods above and you should just have to use your top shelf as a warming shelf.

My little sweet basil leaves poking out of
the dirt. I'll be eating them soon!
Oh herbs...I love 'em all, really. But if I had to pick a favorite for grilling, I'd pick basil. Basil is one of those herbs that is good even if you mess it up. I have completely charred basil before and the aroma and smoke from the leaves added a lot to the dish.  I don't recommend burning it, but if you do, you're safe. My favorite way to use basil is to cut up an entire grill basket of zucchini, yellow squash, onion, button mushrooms, cherry/grape tomatoes and russet reds. Add about 1/4 cup of olive oil, salt, pepper, garlic powder, and paprika. Take about 5 leaves of basil and bruise them (roll them in your hands a few times). toss them in and stir until everything is coated. Place full basket on the grill and let them cook until the potatoes are about 80% done. All other veggies will be perfect and the the potatoes will continue to cook on their own until done. The basil makes everything taste awesome. 
I hope this helps everyone in grilling some amazing vegetables. Just have fun with it and experiment! 


Sunday, May 1, 2011

Thai Chili Beef Burger w/ Soy (BBQ) Sauce

A little while back, I planted a lot of peppers and chilies  for use at home. They are still growing, but I'm not known for my patience. So I bought a package of fresh Thai chilies from the store and let my mind race with what to do with them. Their flavor profile is pretty straight forward. The fruit tastes like a young, tart tomato and the rest tastes like hellfire. It's a tasty burn, but it lasts for about 5-7 minutes. They are great when pickled along with baby carrots as they like to share their heat with porous veggies and also go well with sweets like sugars in coconut or even brown sugar. They are very tasty peppers to say the least! With all these peppers on the way, I need to come up with recipes with which to use them, so expect some extra spicy things out of the ProAm Kitchen.
I came up with this recipe off the cuff and really like how it turned out. It's not authentic Thai by any means (can you tell by the fact that it's a Thai hamburger?) but by blending the best elements of any culture, you can come up with your own awesome creations!


Ingredients:
I used a mortar & pestle to make my chilies into a paste, but
mincing works too.
  • Ground Beef: 2lbs
  • Eggplant: 1/4", sliced
  • Soy Sauce: 3/4 cup
  • Rice Vinegar: 1/8 cup
  • Sesame Oil: 1Tbsp
  • Brown Sugar: 3/4 cup
  • Ground Pepper: 2 tsp
  • Granulated Garlic: 1 Tbsp
  • Ground Ginger: 1/2 tsp
  • Salt: 2 tsp
  • Thai Chilies: Minced or ground into a paste. 5-10 depending on size, audience preference spiciness of peppers. 3/4 will be for the beef mixture and 1/4 for the Soy BBQ Sauce.

Prep Method:

Soy BBQ Sauce:

  1. Place Soy Sauce into sauce pan.
  2. Add half of Rice Vinegar
  3. Add Brown Sugar into sauce pan and let dissolve
  4. Add 1/4 of the minced/pasted Thai chilies
  5. Add ground ginger
  6. Let simmer in sauce pan until sauce begins to thicken to the consistency of BBQ Sauce. Add additional brown sugar if needed.
Thai Chili Beef Burger:
One eggplant goes a really long way. I only needed 4-8 slices
for this recipe, but got a lot more. They're good plain too!
  1. Place ground beef into medium mixing bowl
  2. Add Sesame oil, half of the rice vinegar, ground Thai peppers, granulated garlic and salt.
  3. Add minced/chili paste and mix with hands or rubber spatula until ingredients are thoroughly mixed.
  4. Form four half-pound patties and set aside
  5. Take sliced eggplant and brush one side with sesame oil.
  6. Season eggplant conservatively with salt, pepper and garlic powder.
  7. Repeat for other side and set aside

Grill Method:
Keeping your grill orderly while you cook helps you know
what has been cooked and when you need to flip it.
  1. Grill burgers to medium/medium-well over direct heat for 1.5 minutes on each side. Move burgers to indirect heat to cook to desired doneness. Or just cook the burger the way you are used to cooking burgers on your grill.
  2. At the same time, grill your eggplant slices. You will only need one slice for each burger, but one eggplant goes a long way, so grill extra for a side dish. It's delicious!
  3. When burgers are done and eggplant is done, it's time to assemble. Stack the burger in the following order from top to bottom.
  • Top Bun
  • Soy BBQ Sauce
  • Grilled Eggplant Slice
  • Burger
  • Bottom Bun
Served with grilled corn on the cobb and potato wedges with curry ketchup.

Saturday, April 2, 2011

Grilled, Stuffed Jalapenos

Hey Everyone,
Here's a quick, easy one to spice up your next cookout.
Ingredients:

  • 6 Large Jalapenos, T-Cut, seeded (I'll explain later)
  • 1 Small/medium Jalapeno, topped, seeded, minced
  • 1 Small Red Onion (finely chopped)
  • 8 Slices of Bacon, any variety, chopped. Pork Belly would work too.
  • 1 Block of Cream Cheese (8oz)
  • 1tsp Salt
  • 1tsp Garlic Powder
  • A few grinds of Pepper
Method:
Got these abnormally large jalapenos at the commissary.
Pretty sure they were grown under power lines or by a
nuclear power plant. But they were perfect for stuffing!
  1. Prepare you 6 Large Jalapenos by making a t-cut in the pepper. You can do this by slicing the top of the pepper 3/4 of the way through, almost cutting off the top but not quite. Then slice the face of the pepper from top to tip on one side. The Jalapeno will then tightly flap open and you can remove all ribs and seeds from the inside. *WARNING* I know jalapenos are not that hot, but the oils from jalapenos will stick to your fingers for days and will make themselves known at the worst of times, i.e. using the restroom, picking your nose, rubbing your eyes, and more seriously, when touching your children and preparing their food. Bottom line, it can hurt you and others around you if mishandled, so WEAR GLOVES!!!
  2. begin to fry your chopped bacon. When about halfway finished (it won't take long) toss in your finely chopped onion, and minced jalapeno. When bacon is finished to your liking, place all pan contents on a paper towel to soak up some of the grease.
  3. Place cream cheese in bowl. Add salt, pepper, garlic and all ingredients from paper towel (bacon, onion, minced jalapeno). Stir to combine thoroughly.
  4. Use your fingers to hold t-cut jalapenos open and use a teaspoon or fork to pack the peppers full of your tasty, bacon-packed filling. If it looks a little sloppy, that's okay. No problem.
  5. Place on a medium heat grill over direct heat until charred black spots appear on the flesh of the pepper.  Remove from fire and serve alongside any steak, ribs, or burgers you want!
Even if they look a little sloppy, it's okay. The grill will
make them look great!
A concern people always have is "I don't like spicy things." Well you're in luck! If you want it less spicy, just remove the minced jalapeno portion from the stuffing mix and this will be a minimally spicy recipe. If you're worried about it being in a jalapeno, don't worry about that either. 
When a jalapeno is grilled and the seeds and ribs are removed, most of the oils are transferred into the cream cheese. I won't get into the chemistry of it all, but the short of it is that milk neutralizes capsaicin (the chemical that makes your mouth burn). So, the cream cheese (dairy) will neutralize almost all of the spiciness from the cooked jalapeno. You are left with the flavor of the fruit (jalapeno) which is rather nice. This recipe takes about 10 minutes for prep and about 5-8 minutes for cook time on the grill.
This fire was especially hot, so I made a few bumps in some foil to keep them in place and to protect them from the heat. Worked great! 

Saturday, March 26, 2011

It's All About the Sauce!

I grew up in Mid Missouri. I'm not a huge fan of the town I grew up in. I'm also not a fan of most of the food in this unmentioned town. Don't get me wrong, the food was good, but out of the hundreds of restaurants in the town, there were very few that took advantage of the unique position that the map had placed them. If someone from my town were to head east on I-70, they would hit St. Louis and some of the best regional BBQ in the US. The Memphis style with St. Louis blues go hand-in-hand. If they would head west on I-70, they would have hit Kansas City: home of world renown holes in the wall/diamonds in the rough like Oklahoma Joe's, Arthur Bryant's, Gate's Bar B.Q. and some of the most soulful people you'll ever want to meet. While you're there, you can visit the Negro Leagues Baseball Museum which makes everything better because baseball and BBQ are America! Kansas City is also home to the American Royal Championship every year.


All this sauce and smoke within two hours and only one decent BBQ joint in the town of my upbringing. We were smack-dab in the middle of BBQ Country and only one lonely BBQ Joint/Smokehouse in the entire budding community. There may be more now. I haven't been back in a few years, but everyone wanted the chain eateries that brought in foreign pop culture so they could feel well-rounded I guess. These places were good, but they lacked real depth of culture. What says culture more than heading to Kansas City, visiting the Negro League Baseball Museum, then walking over to Arthur Bryant's for a "sandwich?" I call it a "sandwich" because it's a slice of white bread with a 4"-6" heap of meat on it with another slice on top. I was never able to eat it as a sandwich because it was just too massive. The bread was there to mop up the extra sauce on the plate. The last time I was there, they had 3 types of sauce. They were all amazing!

When I grew up and joined the military, I was moved down to Abilene, TX. Texas is a mix of several types of BBQ but one thing is for sure: It's smokey and it's delicious.  It seems that in Texas, if you were to throw a rock and not hit a BBQ/Smokehouse, you probably hit a Mexican restaurant. But sometimes it was a Mexican place that had a severe Texas smoke influence. It was awesome.

I feel fortunate to have eaten so much BBQ in my short 26 years but there is one problem. I have eaten so much of this BBQ that my styles are mixed and confusing. I like my sauce to be Kansas City Sweet, my rubs to be Memphis dry and all of it to be Texas mesquite smokey. The problem is that I have no regional style. The anti-problem is that all of these regional styles smash together into a no holds barred grill fest that has not received one complaint to this day.
I love rubs, I love sauce, I love smoke and I love smoking in my current location of Germany because my neighbors think I'm crazy when I smoke a brisket or smoker full of ribs in negative temperatures with 8" of snow on the ground. The Germans do know how to BBQ though. It's a unique style that is often used at festivals. I have seen pigs on a rotisserie over wood and I have seen shoulder steaks on a hanging grill called a schwenker cooked over burning grape vines. Both are amazing, but no sauces are used and the ingredients are often left alone to speak for themselves. I have enjoyed both to the fullest extent, but it's just not American BBQ and it's definitely not often done in the winter with snow on the ground. The Germans seem to have more common sense than I do.

Anyways, on to the food. This entry will feature four sauces. The first sauce is a new venture for me. I am trying to see what food mangos and habanero peppers WON'T work with. I have yet to find one, but we will try it and see how it comes out. The second sauce will be a thick, sweet, spicy Kansas City style sauce that should encourage a slow burn mellowed out by a deep sweetness. The third will be a North Carolina Style sauce that is light on body but strong on vinegar. The fourth will be a mustard BBQ sauce that is very similar to the North Carolina style but the mustardy flavors are often reserved for the South Carolina  crowd. 
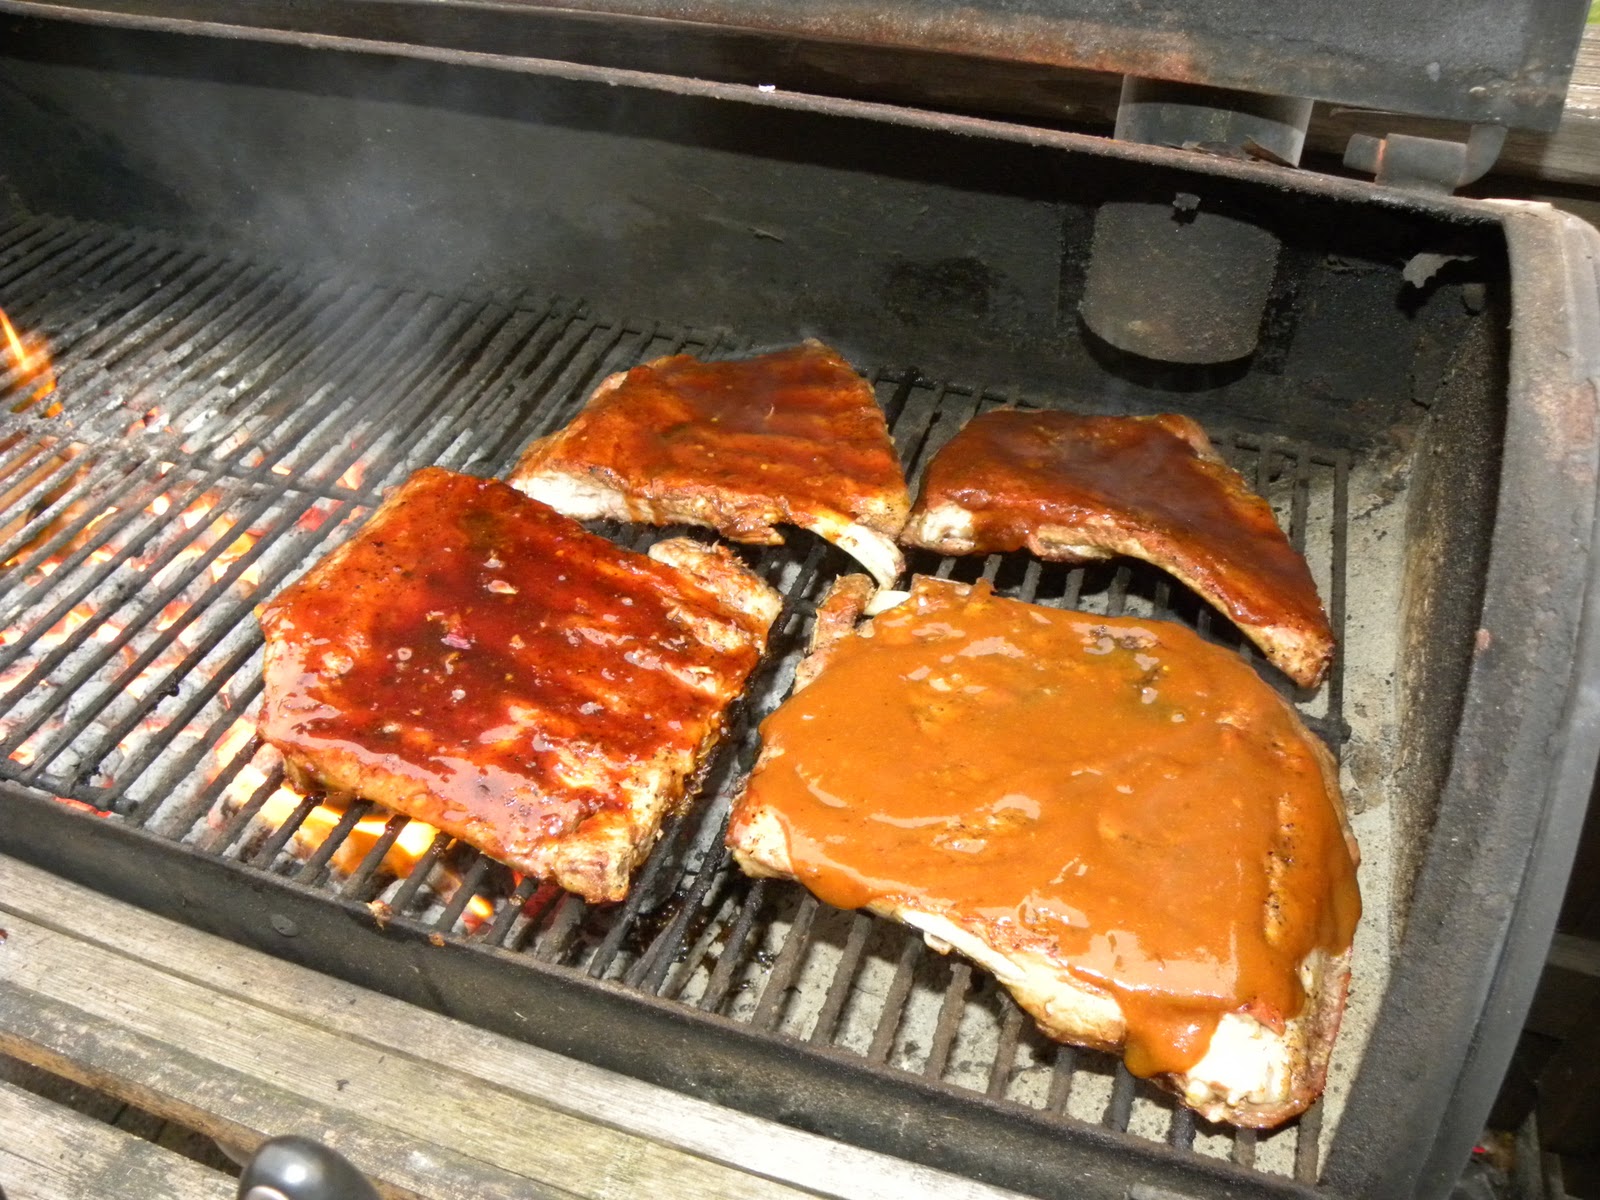
Unstirred Sauces. In order, clockwise from top left:
Tangy NC, Mango-Habanero, SC Mustard, KC Style.
  • All sauces will be served with Texas-style smoked pork spareribs. I find this to be a very versatile, cheap meat that works well with almost any sauce. 
  • All Spareribs will be seasoned with a dry rub that is found in almost all BBQ regions
    • 1/2 Cup Garlic Powder
    • 1/2 Cup Onion Powder
    • 1/4 Cup Salt
    • 1/8 Cup Black Pepper
    • 1/8 Cup Cayenne Pepper
    • 1/3 Cup Paprika
  • Mix all ingredients in a cup and season generously over some olive oil brushed ribs
  • The Ribs will be smoked for 3-4 hours prior to sauce time.
The key here is not only flavor, but versatility and shrinking cook time down because unless you cook for a living, chances are you have other things to do. This is why we cheat. We will start all recipes with the same sauce base. Tomato paste? Nope. Fresh tomatoes? I don't have that kind of time. We will start all of these sauces with crappy, $1.50 generic BBQ Sauce bought straight from the store. *GASP* Is this cheating? Yes, absolutely. Do I care? No. Because I know that given a few extra hours, I'll put in all the time to make my own. But since I have 2.87 kids, a wife and a time-consuming job, I haven't seen an extra few hours in a long, long time. Soooooooo I use Kraft Original as a starter. It's got all the consistency I want, all the tomatoes I need and a ton of artificial ingredients that came out of a lab beaker and are loosely held together chemically and whose artificial flavors can be destroyed and covered by real ingredients.
As always, enjoy these recipes but make them your own. Mess with the ingredients and come up with your own style. Any of these recipes can be easily altered to fit your favorite region of BBQ.


1. Mango Habanero Experiment
So far I have put the mango-habanero flavor combo on just about everything and have not been disappointed to this date. They play well together and this sauce is no different. Sauce is thick, sweet and will take you by surprise as the heat hits you late in the bite. Awesome sauce!
  • One Bottle Kraft Original BBQ Sauce
  • One Mango, peeled and pitted
  • 1 Habanero Pepper, stemmed and seeded
  • 1/2 Red Onion
  • 1/4 Cup Cider Vinegar
  • 1/4 Cup Brown Sugar
  • 1/4 Cup Sugar in the Raw
  • 1 pinch of salt
  • A couple grinds of pepper
Method
  1. Place peeled, pitted mango, half onion, and stemmed, seeded habanero into food processor and puree. You want it to be the same consistency as your BBQ Sauce.
  2. Mix all ingredients into a sauce pan. Stir. Let simmer on low heat for about 20 minutes.
  3. Brush onto precooked ribs using a brush or back of a spoon.
  4. Place ribs over indirect heat. Remove when tips of ribs are showing signs of blackening.
2. Kansas City Sweet & Spicy Sauce
KC Sauces are known for their sweet, spicy and thick nature. Due to the sugar content of KC style sauces, they should be over indirect heat and applied late in the grilling process unless you like burnt sugar.
  • 1 Jalapeno, seeded, stemmed and minced
  • 1/2 Red Onion, minced
  • Juice from 1/2 Lemon
  • 1/4 Cup Cider Vinegar
  • 1 Bottle Kraft Original BBQ Sauce
  • 2 Cups of Brown Sugar
  • 3 Tbsp Crushed Red Pepper
  • 2 Tbsp Garlic Powder
  • 1 tsp Celery Seeds
  • 1 Tbsp Ground Mustard Powder
  • 1 Pinch of Salt
  • A couple grinds of pepper
Method
  1. Mince Onion and Jalapeno
  2. Mix all ingredients into a sauce pan. Stir. Let simmer on low heat for about 20 minutes.
  3. Brush onto precooked ribs using a brush or back of a spoon.
  4. Place ribs over indirect heat. Remove when tips of ribs are showing signs of blackening.
3. Tangy North Carolina Sauce
Carolina style sauce is somewhere between a mop sauce and a BBQ sauce. It's thin and vinegary. It needs to be applied liberally and often. It can take a little more heat than more sugary sauces due to not being as sweet and thick as other sauces. If you are worried about not liking that bitter vinegar flavor, fear not! Vinegar at room temperature is bitter but vinegar at it's boiling point takes on a nice tangy flavor that is slightly sweet, tart and very pleasing. This is a nice sauce if you want to bring out the flavor of your dry rub and not let the sauce flavor take over your meat.
  • 1 Bottle of Kraft Original BBQ Sauce
  • 1/2 Cup of Mott's All Natural, unfiltered 100% pure Apple Juice
  • 1/2 Cup of Cider Vinegar
  • 1/2 Cup of White Vinegar
  • 1/8 Cup Sugar in the Raw
  • 2 Tbsp Crushed Red Pepper
  • 2 Tbsp Garlic Powder
  • 1 tsp Ground Mustard Powder
  • 1 Pinch of Salt
  • A couple grinds of Pepper
Method
  1. Mix all ingredients into a sauce pan. Stir. Let simmer on low heat for about 20 minutes.
  2. Ladle onto precooked ribs using a ladle or spoon. Spread with back of spoon.
  3. Place ribs over indirect heat. Remove when tips of ribs are showing signs of blackening.


4. South Carolina Sweet & Tangy Mustard Sauce
This sauce is awesome! It's roots lie in South Carolina but when I make it, I give it the thickness of a Missouri sauce. It seems to coat better and more mustard flavor sticks around.
  • 1 Bottle of Kraft Original BBQ Sauce
  • 3/4 Bottle of your favorite mustard. Even dijon or whole grain mustard will work. It just depends on your tastes.
  • 1/4 Cup Cider Vinegar
  • 1 Cup Brown Sugar
  • 1 Tbsp Crushed Red Pepper
  • Pinch of Salt
  • A couple grinds of pepper
Method
  1. Mix all ingredients into a sauce pan. Stir. Let simmer on low heat for about 20 minutes.
  2. Brush onto precooked ribs using a brush or back of spoon.
  3. Place ribs over indirect heat. Remove when tips of ribs are showing signs of blackening.
Enjoy!


Sunday, March 13, 2011

German and Belgian Cuisine: Josh and Mike Come to Visit

It's safe to say that when I leave Germany in May of next year, I will remember a lot of places, adventures and people. But what I will remember most is the food. I have seriously eaten myself sick in this place. We have visited tons of places to include castles, some important statues, some places that were important in some place in time, but all I can remember is the food. After referring to iPhoto, I remember that the amazing place was Brussels, Belgium. The statue was the Mannekin Pis, and the important place was the Porta Nigra. But the food, I can name off the top of my head. The one trip where I think I ate more than I ever had before was the time my friends Mike and Josh came from their respective homes of Abilene, TX and Travis AFB, CA.
My wife had given them to me as a Christmas gift and is to this day the best gift I've ever received (aside from life, thanks Mom). While they were here, we didn't have much time so we hit a lot of awesome places that were within a close proximity of our undisclosed location in Germany. I was just reminiscing and thought I'd share some of the memories.
Our first meal out was in Cochem is an awesome little city my the Mosel River. From the main street of the city, you can see dozens or vineyards, a castle, the Mosel River, ferries, architecture and lots of little shops that make Cochem great. There is a restaurant there called La Baia. They serve Italian food that is pretty decent, but their pizza is what I like.  We each had an entire pizza and I don't think there was any left over. 
Belgium is another mecca of amazing food. We headed into Brussels, Belgium because we knew that there was seafood, chocolate and, of course, Belgian waffles. 
While visiting the Mannekin Pis, we found a street vendor who was serving up escargot. In retrospect, eating snails from a guy with a cart in a foreign land seems like a bad idea, but they were delicious! He served it from a kettle filled with celery, broth and onions...I think. It was good enough to go back for seconds.
It might seem strange, but on a cold day, steaming hot snails really hit the spot.
Here's a before and after picture of my son, Jacob, eating snails. He ate them because we paid him off. He didn't really like the texture of it (as you can tell), but he did ask for more. How many kids can say that they've eaten snails...on purpose?

We had lunch at the Hard Rock Cafe in Cologne (a little American, I know). It was the worst meal we had while they were here. The food wasn't bad, but burgers and fries seem so non-European.

Beer is European though! There are a lot of shops like this around Belgium. They sell a single bottle of beer for anywhere from 3-12 Euro per bottle. It's a tourist's price, but the beer is still amazing.

Belgium is also known for the awesome chocolate they produce. The candy shops are too numerous to recall, but they all seem to have their own style. It's a good place to visit if you need to gain 15lbs. 
We did save the best for last. In a little town near Fliegerhorst Büchel, lays the town of Lutzerath. Every town has a hotel/restaurant that defines the village. The Hotel Maas is such a place. The owner, Stefan Maas has served the town for many years just as his mother and father did. The Maas' kitchen lead, Chef Sascha Saxler is a master of German food and loves to impress guests and tourists with his unique style. My guests were not disappointed. We ordered lambmedalions and the restaurant special, The Fuhre Mist. Lambmedalions consist of small, 2oz lamb medallions wrapped in thick bacon and cooked to medium. There is a red wine sauce drizzled over and minced grape leaves in oil around the edge of the plate. It is made from all local meats and produce and is simply amazing.

The Fuhre Mist is a wheelbarrow full of food--literally, it comes in a wheel barrow. The Fuhre Mist has a little bit of everything the Maas has to offer. Pork steaks, chops, potatoes, green beans, fries (pommes),  and three types of sausages. It can feed a family of four with no problem.

It was a great visit and I love showing off Germany and the surrounding countries with friends and family. Only a year+ left here and all I can think about is how much food I haven't eaten yet!


Sunday, March 6, 2011

Surf 'n' Turf Kabobs and Grilled Veggies

My Leffe has a proper, matching glass. Some Pubs in
Germany won't serve you a particular beer if they don't
have the matching glass.
I have long grouped kabobs in with the scourge of the grill like hamburgers, hot dogs, boneless chicken breast and brats. I love burgers, hot dogs, chicken and bratwurst and think that cooking them on a stovetop is a travesty! If you serve your family a boiled hot dog, you should be tried for food crimes, because for some reason, a grill just makes them so much better. Same with a burger and brats (and anything else for that matter). I love the results of a grilled burger, brats, kabob, chicken, whatever. But I don't think they are worth all the time it takes to get a grill going, getting the coals to the right temp and then cooking them for a mere 4 minutes then wasting all that heat and charcoal (yes, only charcoal. If you want to cook with gas, get a nice stovetop). It just seems like a waste. That's why when I do any of these items I go big. It's either for a party of folks, or I do a load of kabobs with a ton of stuff on them.
I have found a way to make just about anything on the grill. Even if it involves purchasing pricey grill baskets and cast iron cookware in many shapes and sizes in order to not have to run inside and check what's on the stovetop. It's worth it to me to buy quality stuff that won't melt on the grill or rust in the dishwasher (the grill basket of course, I never dishwash my CI). I recommend this to others as well. Buy heavy stainless steel bowls or heavy aluminum. The thin stuff will disappoint you just like any other cheap stuff you buy for the kitchen. Good kitchen equipment isn't cheap and cheap kitchen equipment isn't good.
Anyways, on to the recipe.


Surf 'n' Turf Kabobs
Ingredients:

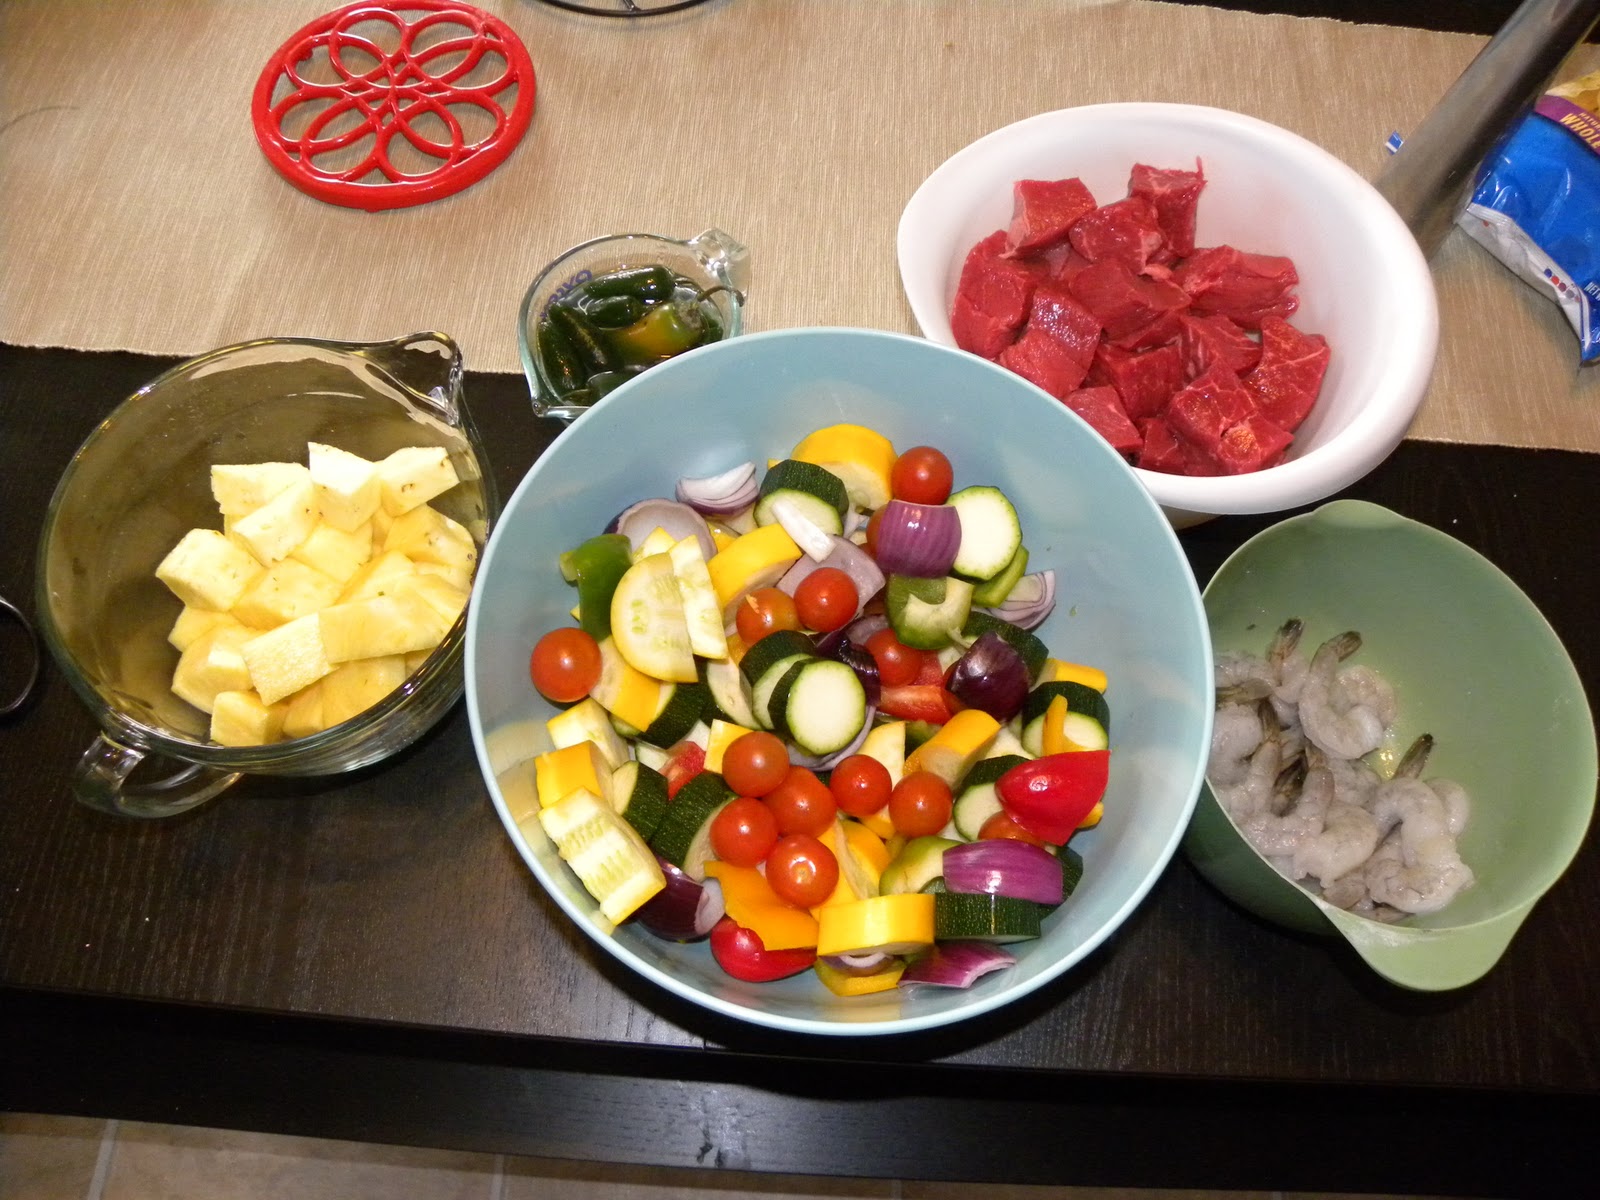
  • Thick (1"-1.5" thick beef cubes of whatever kind you like (if you like inch thick filets, go for it. If you like inch thick chuck steaks, that's awesome too! It's all free game here)
  • 12 Raw, fresh, shell on, uncooked shrimp (you can use peeled shrimp, but the shell will protect the fragile shrimp meat from the fire of the grill. Also, DO NOT use precooked shrimp. Would you use precooked steak for anything other than dog food? No. So apply the same thing with grilling shrimp)
  • 1 Pineapple: topped, bottomed and cored. Cut into 1" cubes
  • 3 Bell Peppers: Various colors, cut into 1" pieces
  • 3 Red/Purple Onions: Quartered, peeled
  • 12-15 Cherry Tomatoes
  • 2 Yellow Squash: Topped, halved, cut into 3/4" pieces
  • 2 Zucchini: Topped, halved, cut into 3/4" pieces
  • 6-10 Big Freakin' Mushrooms: Washed
  • 1/2 Lemon Juice
  • Extra Virgin Olive Oil (EVOO): Enough to coat all the stuff in this recipe
  • Kosher Salt: Season to taste
  • Pepper: Season to taste
  • Paprika: Season to taste
  • Garlic Powder: Season to taste
  • Celery Seed: Season to taste
  • Chipotle Chili Seasoning: Season to taste
  • Dark Brown Sugar: 3/4 Cup
  • Cinnamon: Season to taste
  • Turmeric: Season to taste
  • Ground Ginger: Season to taste
  • 2 Wire Coat Hangers, untreated metal (I'll explain later)
  • Leffe Blonde Abbey Ale (just to sip on while grilling) Season to taste I guess, add as much as you'd like!
Okay, so the biggest thing I can emphasize here is to season everything separately. You would never season your veggies like your steak and you would never season seafood with the same stuff as your sweets so separately is the way to go. Deal with the massive amounts of dishes later, it's cooking time!
A place for everything and everything in it's place. And
an angry wife who doesn't understand why I dirty twice
as many dishes as she does when I make dinner.
Method:

  1. Place Beef Cubes into bowl. Pour EVOO over the top and toss to coat. Then season with kosher salt, pepper, garlic powder, paprika and chipotle chili powder. Mix with your hands. You can try a spoon, a fork, a magic wand, but nothing will work as well as you CLEAN hands. Set aside.
  2. Place shrimp in a bowl and season delicately with kosher salt, lemon juice, celery seed (caraway seeds would work too), pepper. Toss to coat and set aside.
  3. Place all cut vegetables except for mushrooms in large bowl. Cover with EVOO. Toss to coat. Season with kosher salt, pepper, garlic powder, paprika. Toss again to coat.
  4. Season mushrooms lightly with EVOO. Season lightly with kosher salt (mushrooms have a natural musty flavor. When if you season them with the rest of the vegetables, they will lose their mustiness and will taste like everything else. The point of separating your ingredients is to bring out all the individual flavors. Mix if you must, but for me and my house, we will eat musty mushrooms). Toss and set aside.
  5. Place pineapple in bowl. Season with brown sugar, cinnamon, turmeric, ground ginger. Stir until a thick, sugary coating covers the pineapple. Set aside.


Note the coat hanger shaped kabobs
Now this is the point when you get all your skewers and start ramming them through all your meat and veggies and get excited about your awesome ingredients sprawled out in front of you. This is, in reality, where I started freaking out because I could only find 4/10 of my skewers and started cursing the high heavens because all this food was going to be wasted or cooked 4 skewers at a time. But then I had an epiphany! I thought back to an ad I had seen online about some wire skewers that you could put on a grill and you could get 4 of them--But wait there [was] more! Get two more for FREE! Anyways, I didn't have any of these, but I did have wire coat hangers. So I clipped off the hook and started skewer...ing.
I filled the 4 skewers and 2 coat hangers with all the meat and veggies I could and then tossed the rest of the veggies in the grill basket.
I only use one rule when skeoring (look, I invented a new word). Meat does not touch meat. In other words, no surf touching turf. Since you're cooking it all on a hot grill, I don't know that it would really harm anything but it just seems dirty to me. It also doesn't look as good as it could with veggies in between. Other than no surf touching turf, it's a free-for-all. Use a pattern, use a color scheme, whatever suits you!

My method for getting the grill ripping hot really quick.
Now, the grillin'! Get your grill ripping hot to heat up your grates then let them cool to about 450-500 degrees. Toss on the skewers, toss on the grill basket with the extra veggies, sip on your Leffe Blonde Abbey Ale and enjoy the smoke in your face and the chill of the German evening.
Use the beef as a gauge of doneness. When the beef is about medium, pull skewers and let them rest for 5 minutes or so. 
More done than I'd like, but good nonetheless.


Your veggie basket should be close to done when you pull the kabobs so when the meat is done resting, pull the veggies and toss them in a serving bowl.
Grilled veggies. Best way to get kids to eat them!
This recipe really emphasizes "season to taste." This is the best part of grilling. The grill seems to erase mistakes and over seasoning, under seasoning and complete mess ups. On the same hand, it seems to blend flavors so well that even the worst grilling comes out tasting better than if it were made on a stovetop. Enjoy!

Saturday, March 5, 2011

Lemons to Lemonade/Stuffed Pork Chop

In the past, I have voiced my opinions concerning the Air Force Recipe system and it's shortfalls and frustrations. Recently in the Dining Facility that I manage we have been playing with the recipes a bit. The recipe is the same but the method gets twisted a little...okay, a lot. We tossed the method out the window and made our own! We took the lemon methods and made lemonade by substituting our own. We hold true to the ingredients, but make it in a way that people like--not scoff at.
The whole idea is that we take a recipe that doesn't sell and find a way to make it sell. Normally, our stuffed pork chop just doesn't sell. The AF method wants us to take a colorless, flavorless baked pork chop and place an ice cream scoop worth of stove top stuffing on top of it. The customers usually look at it then order a cheeseburger from the grill. But not today, my friends!  Keep in mind that this recipe is for what we have in an AF kitchen. I do recommend making your own dressing/stuffing. And I do recommend straying from the methods of the AF Recipe system, but even though I like to make a mockery of the AF method, we still try to stay close. So please play with this recipe. It's YOUR food, play with it!


Stuffed Pork Chop
Ingredients

  • 4 Thick Cut (1"-1.5" cut) BONELESS Pork Chops
  • Salt, Pepper, Garlic Powder--Seasoned to taste on pork chops
  • 2 Cups Balsamic Vinegar
  • Box of Stovetop Stuffing (Chicken or Pork Flavor, if you can find it)
  • 2/3 Cup Sugar
  • 1/4 Small Yellow Onion, minced
  • 1 Green Apple, julienned
  • 1 Red Apple, julienned
  • Juice from 1 Lemon (mix with water to cover julienned apples in a bowl to prevent browning)
Method

  1.  Make Stovetop Stuffing by using directions on the box.
  2. Season Pork Chops with salt, pepper and garlic powder. Rub seasonings into meat. Toss into a medium heat frying pan. Cook chops to medium well.
  3. Pour Balsamic Vinegar into a sauce pan and bring to an almost boil. Add diced onions. Add sugar as you stir. Keep the sauce moving as it starts to simmer. It will begin to thicken.
  4. After chops rest for about 3-5 minutes, fillet chops down the middle, 3/4 of the way through long ways (it should look like an alligator mouth, not a clam)
  5. Grab a small palm full of stuffing and roll loosely into a ball. Flap open pork chop and place the ball into the mouth of the gator. Place chops on a baking pan and into the a 350 degree oven for 5 minutes. This will give the ball of stuffing a crisp element as well as curl the top of the chop just a little for visual pleasure.
  6.  By now, the sauce should be thickening nicely. Be careful to not let it burn or you will have to start all over with the sauce. Take it off the stove and let it air cool on the counter top or an empty burner. 
  7. Julienne your apples. A julienne is a complicated way of saying that you cut it to look like baby french fries. If you are still confused, check out this link (Julienning). This is best done with a slicer with a julienne attachment, but most people don't have one just sitting around so another option is to use a cheese grater. Use the big holes, not the small ones. As you julienne them, place them in your lemon/water mixture. The acid in the lemon juice will prevent the apples from browning plus it will add another element of tartness. Make sure you use a tart green apple and a sweet red apple. This will create a nice mixture of flavors that will enhance your chops!
  8. Place your sauce in a squirt bottle (ketchup style if you have it). If you don't have one, a spoon will do nicely. Get a small plate, drizzle the sauce on the plate in any design you'd like. Swirls, zig-zag, Jackson Pollock, etc.
  9. Pull Pork chops from the oven and place in the center of the plate.
  10. Garnish with a large pinch of julienned apples.
  11. Enjoy!

Please excuse the sloppy saucing.  A warped tray and  time constraints are to blame ;)
Usually we produce about 16 pork chops for our small facility and maybe 3 of them sell based on looks alone. But this day, we produced 16 and sold 14 of them. It just goes to show that people eat with their eyes way before they eat with their mouths.